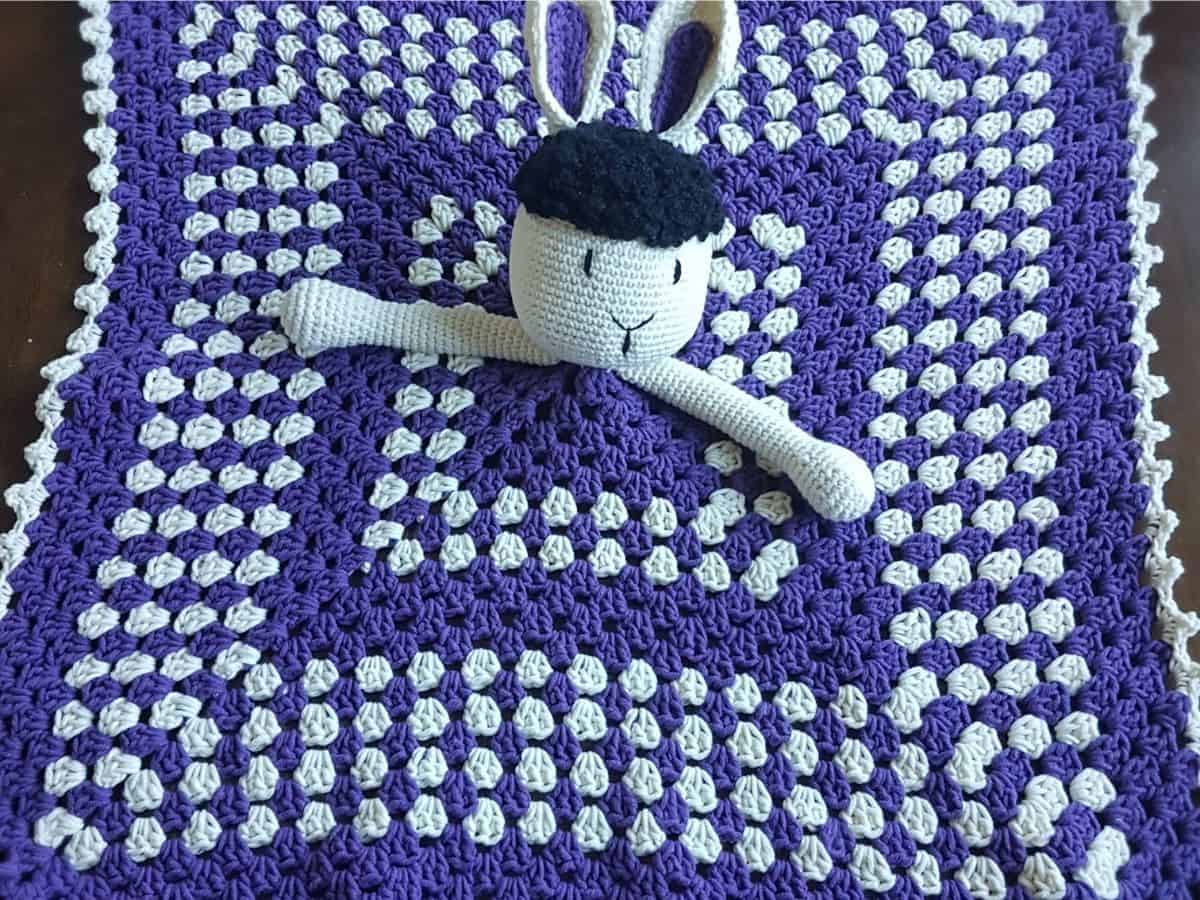
 With all the adorable bunny patterns I’ve seen these past weeks, I couldn’t help but jump in with this Afro Bunny Security Blanket.
The idea was to create a bunny with an afro (African) textured hair, now see how it turned out almost looking like a sheep (I’m laughing at myself), I guess the ears saved it some.
WHY AFRO HAIR
For one, I have never seen a crochet bunny pattern with tightly coiled or curled texture and I wanted to create that. So, even though it does not look perfect on this crochet bunny security blanket, it is something some Africans like me would see and recognize as being ‘like my hair’.
Also, I was aiming to give the bunny a funky, easy going character.
This is a pretty easy pattern to make, as the blanket uses the popular granny square technique. The head is also simple to make with just a basic round of increases and decreases. I thought adding a flower would be a nice feature if you wanted to make it for a girl. Of course it is optional.
You can get the flower pattern here). I was a bit undecided about where the head should be, but finally decided in the middle. I hope the photo saves you the time of having to wonder where best to fix the head.
So, I hope you’ll give this Afro Bunny a try and tag me on Instagram
MORE AMIGURUMI PATTERNS
3hr Amigurumi Doll / Crochet Teddy Amigurumi / C2C Boxy Bunny
It’s ok if you sell items you made using LM patterns. And I’d really love it if you mentioned it was from LM.
And please, do not sell or mass produce LM patterns- (the only exception is if you are donating the items made to charity)
Thanks. You can read more on LM policy here.
Afro Bunny security blanket- Free Crochet Pattern
Materials:
- Alize Cotton Gold Plus in Purple (2 skeins) and Cream(1 and a half skeins)- each skein is 100g, 200mt
- for the hair, fingering weight yarn in Black- 40g, 136mt
- 6 mm, 3.5mm and 2.5mm hook
- embroidery thread in Black
- fiberfill stuffing
- stitch marker
- needle
Abbreviations:
- Dc- double crochet
- Hdc- half double crochet
- Sc- single crochet
- Sc2tog- single crochet 2 stitches together
- Sl st- slip stitch
- Blo- back loop only
- Mc- main colour (purple)
- Cc- contrast colour (cream)
Note:
-Written in U.S terms
-The blanket measures 36×36. It is worked in the regular granny square pattern. In this one I made, I did not ch 1 between the 3dcs. I wanted a more closed space. However, the regular pattern is written here for a few rounds, the rest is repetitive.
-Carry yarn up when changing colours for the blanket
– Alternate yarn in this format, mc-4, cc-1, mc-1, cc-1, mc-4, cc-1, mc-1, cc-1, mc-1, cc-1, mc-1, cc-1, mc-4, cc-edging
– Remember to use your stitch marker when making the bunny head
PATTERN
Blanket (with 6mm hook)
with mc, form magic ring OR ch 4, slp st to 1st ch.
Round 1: Chain 5, work *3dc, ch2* rep ** three times, 2dc. join with sl st in top of ch 3, and in top of ch 4
Round 2: Ch 5, 3dc in previous ch 5 space, ch 1, *3dc, ch 2, 3dc in next ch 2 space, ch 1* repeat ** three times, 2dc in ch 5 space. join in top of ch 3, and in top of ch 4
Round 3: Ch 5, 3dc in previous ch 5 space, ch 1, *3dc in ch 1 space, ch 1, 3dc ch 2 3dc in ch 2 space, ch 1* repeat ** three times, 3dc in ch 1 space, ch 1, 2dc in ch 5 space. join in top of ch 3 and in top of ch 4
Rounds 4-22: Ch 5, work 3dc in previous ch 5 space, ch 1, work 3dc in every ch 1 space and ch1 over every 3dc, work *3dc, ch2, 3dc* in every chain 2 space (in the corners) , finish with 2dc in ch 5 space around. Join with sl st in top of ch3, and top of ch 4. Fasten off and weave in ends.
EDGING
attach cc in any of the corners, ch 1, sc 4 in same space. *sc 2, ch3, sc 2* in every ch 1 space and *sc 4, ch 3, sc 4* in every ch 2 space (the corners), finish with sc 4, ch 3 in corner where you began. Sl st in ch1. Fasten off, weave in ends.
HEAD (with cc and 3.5mm hook, worked in spiral)
Note: rounds 2-12 are worked in blo. from round 13 work under both loops (see photo below)
Form Magic circle
Round 1: sc 6 in ring
Round 2: 2sc in each stitch (12)
Round 3: *sc 1, 2sc* repeat around (18)
Round 4: *sc in next 2, 2sc in next* repeat around (24)
Round 5: *sc in next 3, 2sc in next* repeat around (30)
Round 6: *sc in next 4, 2sc in next* repeat around (36)
Round 7: *sc in next 5, 2sc in next* repeat around (42)
Round 8: *sc in next 6, 2sc in next* repeat around (48)
Round 9: *sc in next 7, 2sc in next* repeat around (54)
Round 10: *sc in next 8, 2sc in next* repeat around (60)
Rounds 11-23: sc around
Round 24: *sc2tog, sc in next 8* repeat around (54)
Round 25: *sc2tog, sc in next 7* repeat around (48)
Round 26: *sc2tog, sc in next 6* repeat around (42)
Round 27: *sc2tog, sc in next 5* repeat around (36)
Stuff the head full
Round 28: *sc2tog, sc in next 4* repeat around (30)
Round 29: *sc2tog, sc in next 3* repeat around (24)
Fasten off, don’t sew closed.
ARMS
Form Magic ring
Round 1: sc 6
Round 2: 2sc in each stitch (12)
Round 3: *sc 1, 2sc in next* repeat around (18)
Round 4: *sc in next 2, 2sc in next* repeat around (24)
Round 5: sc around (24)
Round 6: *sc in next 2, sc2tog* (18)
Rounds 7-9: sc around (18)
Round 10: *sc 1, sc2tog* repeat around (12)
Round 11-34: sc around (12)
align stitches together and single crochet closed. Sew arms to head
EARS (with cc)
Round 1: Ch 12, hdc in 2nd ch from hook, hdc in 9, 6 hdc in last chain. Turn upside down to work on opposite side, hdc 10 across (last st is in same place as 1st hdc) (26)
Round 2: Ch 1, turn. sc 8, hdc 2, 2dc in each of next 6 sts, hdc 2, sc 8. (32)
Round 3: Ch 1, turn. Hdc 10, *2dc in next, 1dc in next* repeat 6 times, hdc 10. (38)
Fasten off. leave long tail to sew to head
(with mc)
repeat Round 1.Sew to cc.
Fold ears, sew the first 3 stitches closed. Attach ears to head between rounds 6 and 10.
HAIR
Notes- You need some patience here. Thankfully, the ‘ridges’ make it easier to work around
– where the ridge ends is the back of the head
Step 1: Starting from the centre, insert hook, make a slip knot and pull out loop, *chain 5, sl st into same space* repeat** 6 times
Step 2: Now begin to work in the ‘ridges’ around. *Ch 5, sl st into next* repeat** till you get to the base of the ear (see photo)
Step 3: Now turn and work backwards, then forth. Keep turning until you work to the ridge before the last (see photo)
Step 4: On the last ridge (ridge before last), *ch 7, sl st into next* repeat ** around to the back of the ears. *ch 5, sl st in next* for the rest of the ridges. Sew head to Granny Square.

steps 1-3
Eyes and Nose
Enjoy!
Thank you for checking out this pattern. Kindly use the SHARE buttons below to let other crochet and craft lovers know. Share your version with us in our Private Facebook group or with #craftherblog on Instagram. Thank you!


Love, Love, Love it!! Perfect for babies.
Thank you so much for sharing…
I am so glad you love it.